Scouting made fun
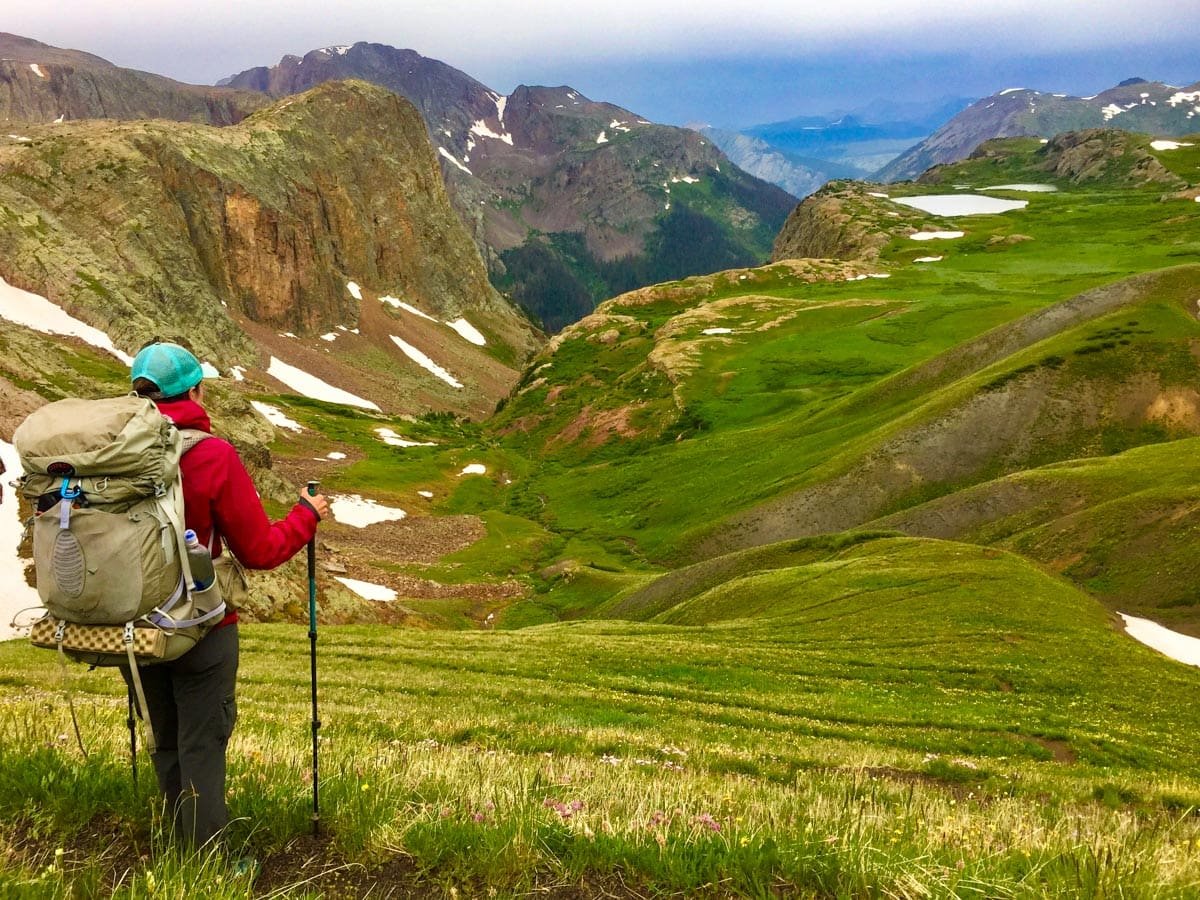
Get Outdoors
Trek Options for the Colorado Trail
This guide is here to help give you and your troop everything you need to know about planning short or long trips on the Colorado Trail. Let’s start planning your trip!

Quick Facts
PERMITS: none (self-registration in wilderness areas)
ROUTE: well signed, well maintained, popular trail
BEST SEASONS: July, August, September
DISTANCE: 485 miles from Denver to Durango
Group Size: Some areas of the Colorado Trail limit groups to 15 WATER: Most sections, with the exception of a few, have good water sources.
ELEVATION: The average elevation of the Trail is 10,300 feet, topping out at 13,271 feet
GUIDEBOOK: Colorado Trail 9th Edition
DATA BOOK: 8th Edition
What you’ll find here
The purpose of this site is to share with you information on everything I have collected while successfully hiking a large portion of the Colorado Trail. Whether you use this to do training hikes to get ready for Philmont or you decided to create your own High Adventure trip here in Colorado. Philmont and many of the other National Scout Camps are amazing, but sometimes our troops like to have some variety in their High Adventure programs which is what led us to the Colorado Trail. And for those of us who have the luxury of living in a High Adventure state like beautiful Colorado, this became a low cost option for our troop to do in between National High Adventure Camps.
As you scroll through this page you will find advice on many topics, such as itinerary options, trail access, how to pack, food, logistics, safety, trail etiquette and many other things. At the bottom of the page there is a link to a printable document that will have all of the different forms I have created to help you in your planning for your own trip. Please keep in mind, my hard work here does not replace the work you will still need to do to make sure you have a proper and full plan for your own trip. These kind of trips take a lot of planning hours and a lot of adults to make them successful. I just hope I am able to help you shorten the time in planning so you can you can have more time on the trail having a blast!
I will be referencing to many other great resources as well, such as Philmont, The Colorado Trail Foundation and many other sites that I’ve come across along the way. I started this site as a ticket item for Wood Badge with the hopes to help other troops continue to get our scouts out into the beautiful mountains of Colorado.
How to Get Here
Let’s start with how to get here. If you live locally then you are probably familiar with the Colorado Trail, whether you have backpacked some of the segments or you’ve just hiked parts of the trails. Each of the itineraries I have listed here should tell you the starting and ending Trailheads (TH). One thing you will need to figure out is will you have someone dropping you and your crew off or will you be parking vehicles. I would recommend, for those close, to get the other parents involved and have them drop you off, because it can take many hours to place vehicles between beginning and ending trailheads. If you do plan to park, then please do your research as many of the trailheads can have limited parking and can get busy on or around the weekends.
For those of you coming from out of town. Renting passenger vans and driving can be one of your best plans, as most airports will not allow you to fly with some of the gear you’ll need while backpacking, such as fuel containers. If you do chose this options, as mentioned above do your research for parking. If you are coming from lower altitude levels, then I would recommend finding a hotel, AirBnB or campground in the Denver area for at least 1 night in order to allow you and your crew time to acclimate to the altitude, as altitude sickness can be one of the biggest challenges when backpacking the Rocky Mountains.
If you choose to fly, then Denver International Airport is your best option, as they have many direct flights to most major cities across the nation. You will need to plan to purchase any gear you cannot carry on the plane, but the good news is there are plenty of sporting good store options in the Denver area. As mentioned above the same thing applies here if you are coming from a lower elevation. If you do your research and plan far enough in advance you can probably even find a transportation company who would take you to the trailhead in a van. When building your transportation plan and fees, don’t forget some of these costs.

Equipment / What to Bring
PACKS AND BAGS
When backpacking a piece of gear that can make the biggest difference in how you enjoy the trip is your backpack. It’s very important to make sure you have a proper fitting backpack, and as an adult it is import that you know how to teach scouts to adjust their packs or to recognize that they have the wrong size backpacks. This does not mean that you have to have an expensive or brand new backpack, but I would recommend that parents take their scouts to REI (or other sporting gear stores) and have them fit them for a backpack. Once you know what size they should be wearing then you can start looking for new or used gear to meet any budget. You can also rent gear if you don’t want to commit to buying.
When going for a week or longer on the trail it is recommended to have a 75L (internal or 65L external) pack.
Scouts should never carry more than 25% of their body weight in their packs, which is why it is important to do a shakedown during/before one of your training hikes. You’ll be surprised at some items scouts think they have to take. Here are some links on how to adjust and pack a backpack, feel free to share.
Clothing
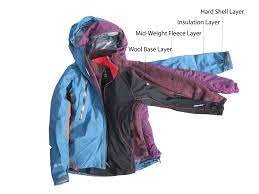
The Colorado Trail can have a wide variety of temperatures depending on when you are on the trail. The high altitudes can still have snow and near freezing temperatures as late as July some years. Therefore, this makes it important to layer while on the trail, as you may wake up finding yourself needing your fleece and/or puffy layer and by 11am you are wanting to be in shorts and a shirt.
Please have some of your experienced scouts educate your team on how to layer. For example, cotton and nylon are not good layers. Instead have some good moisture wicking base layers, such as sock liners and polyester blend shirts. We always have the scouts design a long sleeve moisture wicking shirt for when we do the Colorado Trail and Philmont. This works to not only keep you cool on warm days, but it also protects you from the sun and works as a great base layer. It’s also a great momento to help you remember all your trips.
Footware is one of the most challenging and controversial topics in clothing. The number one reason for people to leave the trail is issues with their feet. There are many people who will swear by backpacking in good trail shoes, but I recommend requiring everyone on your team to wear hiking boots that cover the ankle, as it has been proven at multiple scout camps that less people show up with feet injuries when they do. Make sure whatever boots they are going to wear on the trail are worn during the practice hikes, so they are broke in well before you hit the long trail. You also want to teach scouts how to recognize hot spots and not to be afraid to speak up when they are noticed.
One layer that people skimp on the most is their rain protection. Either they think it is waisted weight or they bring some cheap poncho. In Colorado we are known for our afternoon mountain thunderstorms. Sometimes these can be just 5-10 minutes or they can last half the day, either way it is really important to stay dry.
Here are some links on how to layer.

SLEEPING GEAR
Your sleep system is another major category that relates to comfort on the trail. The challenge with hiking the Colorado Trail yourself vs going to a National camp such as Philmont, is that you have to provide all the gear. For example, at Philmont they do provide some good quality backpacking tents for the whole crew.
If your troop is a backpacking troop, then it is well worth money to purchase some good quality tents to have in addition to your normal tent stock. If you are not a backpacking troop then it may be best for you to take your troop to Philmont, where you’ll have extra support. As mentioned before you, you can rent gear, but I would warn against doing an unsupported trek if you are not an experienced troop in backpacking.
In purchasing a tent, you want them to be 2 person tents, and to be no more than 5-6 lbs per tent. The better the quality you can get the longer they’ll last. Typically scouts will split the tent in half amongst tent buddies. You will also need a ground cloth and stakes for all the tents.
As to sleeping bags and pads, for scouts most any air or foam pad will work, just make sure to have some patch kits available if you have a lot of people with air pads. I would recommend checking the weather for the week you plan to hike, but typically a good 10-20 degree sleep bag will work for most summer months in Colorado. It’s always important to remind scouts to not sleep in the same clothes they hike or eat in, especially in bear country.

FOOD AND WATER
Assuming you are taking a 7 or 12 day trek on the Colorado Trail, you are going to need to figure out resupply points for things like food and fuel. At Philmont the most we carried was 3-4 days of food at a time. This helps keep the weight limits down on the scouts, and minimizes the weight you are having to lift on a bear bag. At Philmont it is easy to lift bear bags because they have provided cable lines at most all of the camp sites, but on the Colorado Trail it is a bit more challenging when you are with a group. They also provide all the food for you at Philmont. This doesn’t make hiking the CT impossible, it just means you will have to plan more and maybe even have some support off the trail.
Utilizing some of the meal plans from Philmont I built out some similar meals that can be purchased for bulk discounts at places like Amazon, Sams or Costco. You can take a gallon ziplock bag and create meals for two just like at Philmont. You can test this system out on your practice trips and then adjust for the longer trip. In each itinerary I have give a few example locations where resupply can happen. There are only a few ways you can resupply while on the Colorado Trail. My recommendation when you trekking with scouts is to have outside support. You can have parents take turns meeting you at one of the trailheads, where you can exchange trash for more food. You could also have just one person as your supply, but this may require additional hotel costs to calculate for the trip, if you don’t live nearby. The last option would be to ship boxes to towns along the way, but I would not recommend this option, as it would require shipping a lot of boxes, and would not create a safe environment with scouts to try and get off trail to collect the boxes.
There are many videos on the Philmont website about how to cook in crews in the back country, so I will not address those here, but I will say it is important to rotate your cooks, so that everyone is getting the experience and checking off some of the merit badge requirements.
As to water, there is typically good water supply along the Colorado Trail, but I would recommend each person carry about 4 liters of water. It’s also good to have in your crew gear an extra water bladder that you can fill up during sections where you may not be camping near water. A good resource for finding water along the Colorado Trail is the Colorado Trail Databook. You are also going to want a good filter system. I recommend a 6-8 liter gravity filter because these can filter a lot of water for a large group in a short amount of time. If not, then you may want to have at least 2 filter pumps, or you’ll end up taking long water restock breaks each day. I would also recommend bringing water tablets to have as a backup.
As far as gear you’ll need for cooking, you should have a good light weight stove, some large 6-8 quart pots and some cooking utensils. I recommend carrying an extra stove in case something happens, or if you have an off trail support system then have an extra with them that they can bring to the next trailhead. Some troops like to cook large meals to share together, which is recommend at Philmont and some troops like to use their pots to boil water and use more freeze dried meals in a bag. You can see the meal plan we used for ideas here. I used the Philmont meal plan to give me ideas, there link is here. Each scout should also have a good mug, something to eat on (I recommend a nice bowl) and a eating utensil. As to fuel, I would recommend having the scouts measure how much fuel they use on their 3 day training treks and then plan out how much to carry.
A list of recommended foods that I have purchased for past group hikes can be found here. Try to add some variety while at the same time purchase in bulk when possible to help save on cost.
Crew Gear
As I mentioned before, a lot of your crew gear is provided at Philmont, so if you are new to backpacking then this may be a good place for you to start. Some of the crew gear I’ve already mentioned above, such as the tents and cooking supplies, but some additional gear you’ll need is listed here.
MISCELLANEOUS ITEMS
You are definitely going to want some maps, a compass or a gps. The Colorado Trail is really well marked, but you are still going to need to navigate along the way. This is a great opportunity for the scouts to get some Orienteering requirements signed off along the trail (this includes the practice trips). Each day the crew should be changing who is lead of navigation. Lead Advisors, don’t forget sometimes a part of scout led, means allowing the scouts to go the wrong way. As a safety rule, I will typically allow them to go the wrong way for up to 15-20 minutes (or 1 mile) before I start asking them often “are we sure we’re going the correct way?”. By the 2nd or 3rd time I’ve asked they will typically pull out the map and compass and re-orient themselves and get it figured out. If you have a younger crew then you may have to give some guidance on the occasion, but try to limit this as much as possible, but you definitely don’t want them to get lost or stranded away from camp prior to dark.
Another crew item is toilet paper and a trowel. PLEASE make sure your scouts are going poop and that they know how to dig a proper cat hole and get off the trail. We like to make a game of it and have scouts rank their bowel movements from 1-10, and I like to brag a lot about how I get extra points when I can make it in my cat hole in the first try. You will find the scouts will get aggravated at first about having to stop every time someone needs to use the bathroom, but it’s important we reinforce the importances of good bathroom practices on the trail. If you don’t know this already, poop should never touch the trowel, this is a safety issue, use a stick if you miss the cat hole. Having some hand sanitizer in the kit is good as well, and having the kit easily accessible!
A few other miscellaneous items are: money, fishing equipment and postcards. Before, during and after the trail you’ll probably pass through some towns, so I always tell scouts to bring some money for any gear they may have forgotten, any souvenirs they may want or because they may want to buy a candy bar along the way. If you want to fish, there are many lakes along the trails, you’ll just have to look at the maps of your treks and don’t forget to look up the requirements for Colorado fishing license. The last thing I’ll mention here is postcards. Sometimes it can be fun for scouts to communicate with the family back home while on the trail, and postcards is a great way to do it without having a scout get too homesick. You can always collect the postcards when you resupply or drop them off when/if you pass through a town.

SAFETY
Safety is one of the most important items when going into the back country with a group of scouts. Just like with Philmont, it is important that your adults be trained in CPR and Wilderness First Aid. You also want to have a decent number of scouts trained in these as well, as it is probably more likely that something will happen to us older folks and we’ll need our scouts to save us. I have never been on a trip where I did not have to do at least some minor first aid on the trail. This could be something as simple as attending to a blister, a small cut, a sun burn, or even something major that may require a scout to leave trail. This is why one of the crew items you will find on the list is a first aid kit.
You want one big enough to support the number of people you have on the crew, and it is important that multiple people know what is in the kit and how to use it. Many scouts are used to carrying a first aid kit in their 10 essentials, but if they want to do this when backpacking try to keep them small, because when you are carrying it as crew gear it doesn’t need to be individual gear as well, and it helps you as a leader to know when scouts are having issues. For example, if you didn’t notice a scout slapping on multiple bandaids on blisters vs using something like moleskin then you could end up with a lot bigger of an issue down the trail.
This is another reason why I recommend that you enlist a parent or scouting adult to provide local support to the crew. If a situation is not life treating, but you find yourself needing to get a scout off the trail, having someone you can message to be at the next trailhead is very helpful. This brings me to the topic of communication. There are many places along the Colorado Trail where you will have cell phone service, but I highly recommend at least 1 person has a satellite communication system. This could be used to communicate with your supply person on when you expect to be at the next resupply location or it can be used to signal for an emergency extract.
Lastly on safety supplies, you should make sure the crew has some sunscreen and insect repellent. I promise you, on the Colorado Trail you will use them both. This is another item than can be crew gear vs having to be individual gear, just make sure you have enough for the group.
BSA policy states that you will need medical forms for all the scouts and adults, A, B and C. You should be familiar with these forms, so you know who has allergies or takes medicine. You should have one adult in charge of all the meds for the crew.
Here is a list we have used on multiple events to help the scouts pack.
Here is a list of some of the gear we have used or gear I recommend.
Where to Go
Disclaimer: This site is not an official BSA affiliated website, these itineraries were created from all the research I collected while planning my son and I’s Colorado Trail Though-Hike, from all the training hikes we’ve done and from the many years of hiking on the Colorado Trail. Though I have backpacked each of the segments listed in the itineraries, I may not have stayed exactly at each of the locations it set for campsites. When I’ve hiked these segments in the past and as I hike more of them in the future, I continue to try and verify the areas. I used the 9th Edition of the Guidebook for the mileage numbers, but then I would use the Databook while on the trail, and I noticed there is a slight difference in the mileage references to each of the spots. From my experience and according to the Colorado Trail Foundation the newer Guidebook should be the most accurate, but no matter how accurate any of these guides may be I always recommend when it comes to safety, such as making sure you have enough water, don’t rely only on the guides or my itineraries, as some of these water sources are seasonal.
Beginner Itineraries
My #1 recommendation for beginner backpacking high adventure trips is to do a Philmont Trek. Philmont is an amazing camp and provides a lot of the work to support your trek. They provide all the food, a good portion of gear, scouting programs along the trail and a great support staff. So if you have newer scouts, or you’re just a troop that does do a lot of backpacking, then Philmont is a great way to make sure you are successful and that the scouts have a lot of fun!
If you have done Philmont but you are still looking for a beginner itinerary on the Colorado Trail, then here you go. You’ll notice that I don’t have a lot of options for beginners, as the Colorado Trail is a bit more challenging and in most situations is better suited for scouts with some good backpacking experience. I also did not start the beginner itinerary in Denver, which is the state of the Colorado Trail, because segments 1 and 2 are a bit more challenging to break into small milage days, and segment 2 is one of the driest segments on the trail.
One last recommendation. When creating a beginner itinerary you try to keep the daily mileage small, which shortens the amount of time you are on the trail each day. This can be good for new hikers, but the challenge comes with finding stuff to do to fill the rest of the day. At Philmont they do this by providing program options for the scouts to choose from. This keeps you from having a whole lot of board scouts. If you choose to take this itinerary, I would highly recommend in trying to build out some fun program activities that can be done once camp is set up each day.
Beginners 1 Week Itinerary (Segments 3-5)
Little Scraggy to Kenosha Pass
43.4 miles
7,104 elevation gain
4,977 elevation loss
8 days
Day 1: Camp at 5.3 miles (water) (7,824) (5.3 miles onto Segment 3 and total miles for the day)
Day 2: Camp at 12.1 miles (water) (8,127) (12.1 miles on S3) (6.8 miles for the day)
Day 3: Camp at 17.1 miles (water) (9,385) (4.6 miles on S4) (5 miles for the day)
Day 4: Camp at 21.3 miles (water) (10,199) (8.8 miles on S4) (4.2 miles for the day)
Day 5: Camp at 26.9 miles (dry, water .5 miles prior) (10,929) (14.4 miles on S4) (5.6 miles for the day)
Day 6: Camp at 34.1 miles (water) (10,174) (5.2 miles on S5) (7.2 miles for the day)
Day 7: Camp at 37.3 miles (water) (9,518) (8.4 miles on S5) (3.2 miles for the day)
Day 8: End at 43.5 miles (9,969) (end of S5) (6.2 miles for the day)
Trail Access for Emergency or Food Drops
Keep in mind that due to the small mileage being done on the beginner itinerary, your emergency access could me many miles away. Please plan to travel with a emergency communications device and do your research before you go.
Day 1: Little Scraggy Trailhead (TH) or Rolling Creek TH
Day 2: Rolling Creek TH
Day 3: Rolling Creek TH
Day 4: Long Gulch Trail Access
Day 5: Long Gulch Trail Access
Day 6: Long Gulch Trail Access
Day 7: Kenosha Pass
Day 8: Kenosha Pass
Advanced Itineraries
Colorado Trail 1 Week Itinerary #1 (Segments 1-6)
Denver – Breckenridge (Segments 1-6)
104.6 miles
13,662 elevation gain
13,937 elevation loss
8 days (start at 5,522)
This itinerary is a more challenging trek with an average of 13 miles per day with an average of 2,000 ft of elevation gain. If your troop is coming from a lower elevation this is a good starting point, as it starts in Denver (5,522) and gives you a few days before you are at the higher elevations.
Day 1: Camp at 16.6 miles (6,240) (water within a .2 mile area) (16.6 of 16.8 of S1)
Day 2: Camp at 30.4 miles (7,746) (water)(ends 2.1 onto S3) (13.8 miles for day)
Day 3: Camp at 43 miles (9,146) (water) (ends 2.5 miles onto S4) (12.6 miles for day)
Day 4: Camp at 48.8 miles (10,314) (water) (ends 8.3 miles onto S4) (5.8 miles for day)
Day 5: Camp at 62.4 miles (10,174) (water) (ends 5.3 miles onto S5) (13.6 miles for day)
Day 6: Camp at 74.8 miles (9,228) (water) (ends 3.1 miles onto S6) (12.4 miles for day)
Day 7: Camp at 91.1 miles (9,981) (water) (ends 19.4 miles onto S6) (16.3 miles for day)
Day 8: End Trail at 104.6 miles (9,197) (end of S6) (13.5 miles for day)
Trail Access for Emergency or Food Drops
Day 1: Waterton Canyon Road Parking Lot at beginning and Douglas Co. Rd 97 (South Platte River Trailhead (TH) at the end of the day)
Day 2: South Platte River TH; FS Rd 538 (6-10 miles) and Hwy 126
Day 3: Little Scraggy TH
Day 4: Rolling Creek TH (8.3 miles away) and Lost Park TH
Day 5: Long Gulch TH
Day 6: Kenosha Pass
Day 7: Kenosha Pass and Gold Hill TH (S6 is the longest segment of the week away from roads)
Day 8: Gold Hill TH (5 miles from Breckenridge) (98 miles or 1 hr 35 mins to Denver Int. Airport)
Colorado Trail 1 Week Itinerary #2
Kenosha Pass – Mount Massive (Segments 6-10)
98 miles
18,604 elevation gain
18,511 elevation loss
8 days (start at 10,660)
This itinerary is a more challenging trek with an average of 13 miles per day with an average of 2,000 ft of elevation gain. If your troop is coming from a lower elevation you should plan to take a day or two to acclimate to the altitude in the Denver area, as altitude sickness is a quick way to require scouts to leave the trail early.
Day 1: Camp at 15.8 miles (10,660) (water) (15.8 of Segment 6)
Day 2: Camp at 29 miles (9,458) (water near horseshoe gulch)(ends 29 miles onto S6) (13.2 miles for day)
Day 3: Camp at 43 miles (11,249) (water) (ends 11.3 miles onto S7) (14 miles for day)(treeline)
Day 4: Camp at 51.1 miles (10,854) (water) (ends 5.2 miles onto S8) (8.1 miles for day)
Day 5: Camp at 66 miles (9,671) (water .01 away) (ends 20.1 miles onto S8) (14.9 miles for day)
Day 6: Camp at 79 miles (11,451) (water) (ends 7.7 miles onto S9) (13 miles for day)
Day 7: Camp at 90.3miles (10,644) (water .9 back) (ends 5.4 miles onto S10) (11.3 miles for day)
Day 8: End Trail at 98 miles (10,065) (end of S10) (7.7 miles for day)
Trail Access for Emergency or Food Drops
Day 1: Kenosha Pass
Day 2: Kenosha Pass or Gold Hill TH far for both
Day 3: Gold Hill TH and CO Hwy 91
Day 4: CO Hwy 91
Day 5: CO Hwy 91 and Tennessee Pass
Day 6: Tennessee Pass and Timberline Lake TH
Day 7: Timberline Lake TH
Day 8: Mount Massive TH (12 miles / 25 minutes to Leadville)
Colorado Trail 12 Day Itinerary
Denver – Breckenridge (Segments 1-6)
98 miles
18,604 elevation gain
18,511 elevation loss
8 days (start at 10,660)
This itinerary is the same distance as the 1 week #1 itinerary, but with a smaller mile count per day. This is still considered an advance itinerary. If your troop is coming from a lower elevation this is a good starting point, as it starts in Denver (5,522) and gives you a few days before you are at the higher elevations.
Day 1: Camp at 8.7 miles (6,177) (water) (8.7 of Segment 1)
Day 2: Camp at 16.6 miles (6,240) (water .2 miles away)(ends 16.6 miles onto S2) (7.9 miles for day)
Day 3: Camp at 30.4 miles (7,746) (water) (ends 2.1 miles onto S3) (13.8 miles for day)
Day 4: Camp at 40.2 miles (8,127) (water) (ends 11.9 miles onto S3) (9.8 miles for day)
Day 5: Camp at 49 miles (10,314) (water) (ends 8.5 miles onto S4) (8.8 miles for day)
Day 6: Camp at 60 miles (10,366) (water) (ends 2.9 miles onto S5) (11 miles for day)
Day 7: Camp at 65.5 miles (9,521) (water) (ends 8.4 miles onto S5) (5.5 miles for day)
Day 8: End Trail at 74.8 miles (9,828) (water) (ends 3.1 miles onto S6) (9.3 miles for day)
Day 9: End Trail at 87.1 miles (11,135) (water) (ends 15.4 miles onto S6) (12.3 miles for day)
Day 10: End Trail at 91.1 miles (9,981) (water) (ends 19.4 miles onto S6) (4 miles for day)
Day 11: End Trail at 100.7 miles (9,458) (water) (ends 29miles onto S6) (9.6 miles for day)
Day 12: End Trail at 104.6 miles (9,197) (end of S6) (3.9 miles for day)
Trail Access for Emergency or Food Drops
Day 1: Waterton Canyon Road Parking Lot at beginning and Douglas Co. Rd 97
Day 2: Douglas Co. Rd 97 and South Platte River TH; FS Rd 538 (6-10 miles) and Hwy 126
Day 3: Little Scraggy TH
Day 4: Rolling Creek TH
Day 5: Rolling Creek TH (8.5 miles away) and Lost Park TH
Day 6: Long Gulch TH
Day 7: Long Gulch TH and Kenosha Pass
Day 8: Kenosha Pass
Day 9: Kenosha Pass (15.4 miles away) and Gold Hill TH (17.5 miles away)
Day 10: Gold Hill TH (13.5 miles away)
Day 11: Gold Hill TH (3.9 miles away)
Day 12: Gold Hill TH

Right of Way
Yield to uphill hikers
Hikers yield to pack animals
Bikers yield to hikers
Passing
Announce yourself politely if you pass
Pass safely
Pass as a group
Let others pass
Noise
When around other be curtious
When alone sing and have fun
Enjoy nature sounds
In bear country (noise is ok)
Leave No Trace
Stay on the trail
getting off causes erosion
widens trail
IF you have to get off the trail stay on durable surfaces
Take only photos, leave only footprints
Pick up trash as you go (leave it better than you found it)
Poop (he said poop) more than 200 feet away from water or the trail, catholes 6 to 8 inches deep
Respect wildlife
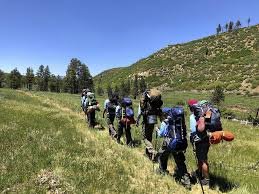
Hiking in a group
Give right of way to smaller groups
Understand your impact
Meeting People
A scout is kind
Training Plan
When you are getting a scouting crew ready for a week plus backpacking trip you need to have a good training plan laid out. Not only do you want to make sure the scouts or adults are physically ready for the trip, but all the practice hikes helps you also know what gear the scouts and the troop has and/or may still need.
If you are planning on a mid summer trek then I would have the scouts start their training around the first of the year. They can start by taking walks in a nearby park or walking the steps at a football field.
Day Hikes:
For the formal training, I would start with 3 troop/crew day hikes. The first one should be 5 miles and the next two 10 miles, this way you they can count towards some of the hiking merit badge requirements. For the first hike the scouts should wear whatever backpack they plan to take on the trail, but with very little weight in it (maybe just their 10 essentials). For the next two hike they should slowly start adding weight to their packs, but no more than 10-15% of their weight. During these hikes you should be examining their gear, just as boots and backpacks, helping them adjust them to proper fitting, and be discussing some of the requirement from the backpacking merit badge.
discuss hazards that can be seen on the trail
cover first aid requirements
outdoor ethics
discuss fitness
discuss requirement to log/journal about each of the hikes
Shake down treks (3 days / 2 nights)
You are going to want to do two weekend training backpack trips to start getting the scouts used to life on the trail. I would also recommend at one of the scout meetings to have the older scouts show the younger ones how to pack a backpack and to discuss what you should pack and what you should not. These treks should be 3 days, 2 nights and 15 miles each in order to meet the backpacking merit badge requirements. You will be surprised at how challenging it is to find a 15 mile loop to practice on, so for those in the Denver area I’ll provide a list of the ones we have done.
On these treks is where you are going to want to test out your meal plans and all your gear. We took gallon ziplock bags and built out our own meals for two, which is exactly how Philmont does it, except you get to have a say in what’s in the bags. These hikes are going to be challenging for scouts newer to backpacking and is really going to test the quality of their gear. Make sure the scouts are talking about hot spots, blisters and trail hygiene. You should also split the crew into buddies, as this will be their tent and food buddy for all the trips, and start getting the scouts used to building out and working from a trail roster. Here are some backpacking merit badge requirements that should be discussed before or on the trail:
how to pack a backpack
how to limit weight
how to create an emergency plan
leave no trace
proper way to deal with waste
how to treat water
how to use a map and compass
discuss different types of stoves
The backpacking merit badge requires 3 - 15 mile weekend trips, but we found it difficult to try and do 3 mountain trips in Colorado without having them too close to each other. You can either plan to do another 3 day weekend trip once you return, the next year, or allow them to do it on their own. Additionally, the merit badge calls for a service project to be done while on the trek. Our scouts did this requirement on their Philmont trek, but you could also plan something while on the Colorado Trail. I would imagine the Colorado Trail Foundation would be more than happy to have your crew work on part of the trail while on your trek. We have not done this on the CT, so I don’t have anything to give you on this one.

As I have mentioned many times above, it takes a large amount of training and people to pull off a High Adventure trip, especially one on the Colorado Trail. Though a large majority of the pre-planning will be done by the High Adventure Committee you put together and the Lead Advisor, it’s really important to make sure that you identify who will be the scout Crew/Trek Lead, and make sure they are involved in this planning from the beginning. This is one of the few positions on a high adventure that will not change. Once you are on the trail, which includes all the training day and weekend hikes, the Crew Leader should always be the one in charge, so the more they are involved in the planning the more they will be set up for success in leading the trip. The Lead Advisor is mainly on the trip to advise the Crew Leader and to make sure nothing bad happens.
The chain of leadership on this trip goes as follows: the Crew Leader, the task leaders (which will change each day) and then the scouts. The Lead Advisors is there to advise the Crew leader and the remaining adults/advisors are merely there to be extra safety eyes for the Lead Advisor and to have fun. If a scout comes to an adult they should always be directed back to the Crew Leader, unless there is a safety issue.
I would recommend setting up a regular touch point for the Crew Leader and Lead Advisor to meet each day. I typically allow the Crew Leader to set this time, but normally recommend it being either at the end of the day or first thing in the morning before the crew wakes up. During these meetings it’s important to try not to give directions, but to ask opening questions like, what is your plan for tomorrow, what do you think will happen if you do that, what is your plan for water, what did you do right today, what can you do better tomorrow, how is the crew doing, and what can you do to make tomorrow a better day for all? Sometimes you will find they come to these meetings not knowing these answer, because maybe they haven’t thought about it, but hopefully they learn what is expected of them during the training trips. Adults, you should really try hard not to give directions during the day unless there is an emergency or threat of safety. The more you intervene or override the Crew Leaders directions the more the scouts will see you as the leader and not the Crew Leader. If you do want to give the Crew Leader some feedback, then try to do it at your set daily meeting. But if it can’t wait till that time, then try to discretely ask the Crew Leader if you can have some time to chat with him/her at the next break.
So then the question is, when should you intervene? If your answer is when I start to see things going wrong, then I would say no, that is not a time to intervene (unless it is a safety issue). How many times in your career have you learned from your own mistakes? Giving scouts a safe place to fail, or as I like to say, giving scouts a safe place to be creative in finding solutions to situations, is one the best (and hardest) things we can do as adult leaders. The only time I believe you should intervene during the day is if a safety situation is about to happen or if a youth protection issue is building.
One thing I get asked a LOT is, what do I do when I notice they are going the wrong way on the trail. Is it not my place as a adult leader to recognize when they are doing something wrong and step in to make sure they are given the proper training? My answer to this is, yes, but not on the trail. If you have an issue with the scouts knowing how to navigate, then hopefully you are identifying this during the training hikes. In most cases you should always have at least a couple scouts who are good at each topic and can help the others learn, but if you do run into the situation where non of the crew know how to properly navigate, then you can recommend to the Crew Leader that you put together a Orienteering class at one of the next meetings.
I typically set a safety rule with the Crew Leader that says I will allow the crew to go in the wrong direction for up to a mile before I throw the safety flag. Yes this means you may get in some extra miles on some days, so be prepared. The only time you should adjust this rule is if you are starting to run out of daylight or a safe time to get to camp. For example, the crews plan may be to hike 8 miles today before setting up camp, but because they took a couple wrong turns or took to many breaks, you may have to step in and tell the Crew Leader that he/she needs to adjust their plan and find a camp location sooner. One thing I will do normally, is when we are about a quarter or half a mile out in the wrong direction, I will start to ask questions like: how far do we have to go today, what are we supposed to be looking for in this section of the route, or are we going in the right direction. The scouts have started to learn once I start asking those kind of questions they know something may be wrong and they will typically stop and re-orient themselves on their map. Very rarely do I actually have to throw the safety flag. Even more rarely have we ever had to do more than 2-3 extra miles in the day.
Here is a one page trail guide for the Crew Leader to help lead them in their daily decisions.
Here is a roster for the Crew Leader to use to assign task leaders for the trek.
Scout Led
One of the biggest differences in Cub Scouts and Scouts BSA is the ideal of Leadership Development. There are many ways troops work to help scouts develop leadership skills, but the primary way is by allowing scouts to lead. This is almost never the easy way and especially can be challenging when out on the trail, but there is no better opportunity to learn leadership than on a High Adventure trip.

Bear Bags
One of the most challenging things I’ve ever had to do in my backpacking history is to figure out bear bag safety for a large group in the Colorado Mountains. The most common tree in the Colorado Rocky Mountains is the Ponderosa Pine. Because they are well adept at surviving harsh winters, they typically do not have large limbs, which make it difficult for bear bags.
At Philmont this is not as difficult of a task as the majority of the camps have cables placed in designated trees for the bear bags to be hung, which allows them to handle large amounts of weight you find with large groups. When we first started doing our training weekend hikes to prepare for Philmont, bear bags was our weakest and most challenging moment for the crew. We ran into issues. Because the limbs of most trees were so small or clumped together you could not just hang the bags from one limb and get the bags out of the reach of a bear. Instead you have to create a two tree hang. When you have the weight of 3-4 days of food for 12+ people, this can make it very challenging to set only one bear hang. From my experience, instead of bringing a larger and heavier rope to handle this much weight, it can be easier to split all the smellable gear and set multiple bear hangs.

Bear-Muda Triangle
If you are not familiar with the Bear-muda triangle, then the basics is that you don’t want to sleep near your smellables. This is both where you set your bear hang and where you cook and eat your food. When you get to your camp area, one of the first things the Crew Leader and team should do is to identify the Bear-muda triangle.
If you don’t do this first, then the crew may go through all the work to get camp set up, just to find out the best place to hang their bear bags is right next to camp. If there is enough time in the day left, this can be a good learning moment for them to have to figure it out. It’s a mistake they will rarely make more than once. You also want to make sure that if they ever spill any food on their clothes that these get put into a bear bag as well.


Now Go and Get Outdoors!!!
I really hope this information has been helpful for you. I would love to hear from anyone who utilizes some or any of this information and how your trips go. Do you have any recommendations for things that I should add to the list, or did you find any challenges with anything on the site. In the future I plan to add more options and will continue to share any information I feel would be helpful. Go to my About Me page to learn more about who I am. To contact me go here, and shoot me an email.
Get Outdoors!