
Get Outdoors!
Gear List
My Gear List or Recommendations
When it comes to backpacking, sometimes finding the right gear can always be the hardest part. Whether you are looking for quality gear that can last through years of scout use or just trying to find your own gear, hopefully I can point you in the right direction to get started. You’ll find high quality gear to be pretty expensive at times, but sometimes you just come across something that is so great no matter the brand. Throughout my list, I try to not only give what I have, but I will also try to give options for those starting out. A goal I have set for many years is to budget each year to purchase at least 1-2 higher quality items that I know will last for years or decades to come. I would not consider myself an ultralight person, but having this goal has allowed me to get some amazing gear that does eventually help cut down on weight and has lasted me many, many years.
When it comes to backpacking gear, you will find the lighter the item the more dollar signs are typically attached. You do not need the lightest weighted gear to backpack, but the lighter your pack is the more miles you’ll find you can do and the more comfortable you’ll be on the trail. Weight can also matter for young scouts. You should never allow scouts to hike with more than 25% of their weight, and when they are first starting out they should try to have even less than that.

There are three main categories in backpacking where you will spend the majority of your money, your shelter, your sleep system and your backpack. Though scouts have the benefit of youth on their side, it is still important for them to have the right gear. Whether they are purchasing gear new, buying it second hand, or even getting hand me down gear from other scouts. I recommend having your troop host some gear swaps or even allow parents to donate gear to the troop as their scouts out grow items, this will help you outfit newer scouts who may not have the means to do so themselves.

Shelter
Let’s start first with your shelter. Almost all troops have tents they have purchased for their scouts to go camping, but not all troops keep a stock of backpacking tents as well. It is important to not use regular car camping tents for longer backpacking trips, as they can be heavy and bulky, but you should also not let scouts use the troops backpacking tents on regular car camping trip, as you want them to last.
My Recommendations
A good entry level backpacking tent is the REI Trail Hut 2 at just under 6 lbs., but I would recommend the REI Half Dome as it is better made and just over a pound less. Each of these tents also come with a ground cloth, which is highly recommended with scouts.
I myself purchased the Big Agnes Tiger Wall UL 2 a couple years ago, which weighs in at 2 lbs. 8 oz. I would not recommend something like this for scouts because it is a lot more delicate and easier to tear, but for an adult who loves backpacking as much as I do, then this is absolutely been an amazing tent for me.
I also have an REI Quarter Dome, which they stop selling, that still holds its own, I just decided to replace it with the lighter Big Agnes as one of my big purchases for the year a couple years ago, but my boys still use this tent if they are both going on the trip. I also have a 1 person tent I bought on Amazon by Clostnature. For the price, this tent is not a bad 1 person tent, but I did not like how little room I had in the tent and it really did not save that much weight compared to my Quarter Dome. I almost sent it back, but my oldest still likes to use it when he is going by himself, so we kept it. I find that I like to be able to have room to move around, so I normally end up going with a 2 person backpacking tent for just myself and sometimes my dog.
I also broke down last year and bought a light weight tarp to carry. In the Colorado mountains we are known for having afternoon thunderstorms, and I had gotten tired of having to go retreat into my little tent ever time it rained, but I didn’t want to carry a heavy tarp that I may or may not use. So I finally broke down and spend some money on a light weight tarp. I purchased the REI Quarter Dome SL Tarp, which weighed in at 18 ounces, but they stopped selling it. So, here is the ALPS Mountaineering Tarp which has similar specs if you are looking for this option.
Car Camping - When I’m car camping with my family we use the Coleman Montana 8 Person. This tent is huge. We have put two queen air mattresses on each side and still had plenty of room to change in the middle. This tent has also survived a trip where we got 20+ inches of snow in 24 hours. Granted we were waking up ever few hours knocking the snow off the top, but it still survived where another dome tent the boys were in did not. When I go on scouting trips with the troop I like to have a tent large enough I can stand up in, spread my stuff out and go inside to change clothes. I found this CORE 4 Person tent on Amazon that works really well.
If you are looking for car camping tents for your troop, then there are a lot more options out there, because you are really not having to worry as much about the weight. In this situation I would recommend doing a good fund raiser and buying quality tents that will hopefully last your troop for years to come. Our troop went with a Cabela’s 4 person dome tent, as they give scouts some room to move around in, or on winter trips they can have 3 or 4 pile into one tent in order to keep warm. You can also reach out to your council to help purchase tents, because sometimes they have left over tents from Jambo or something that you may be able to purchase at a discount.
You will most likely spend more money on backpacking tents than standard tents, so you want to make sure the scouts know proper tent care when using them. When looking to purchase large amounts of tents for your troop, it can be best to approach a major retail store like REI or Big 5 to see if they would be willing to give discounts on bulk orders or even donate some gear to help you get started. Keep in mind in scouting, scouts will be staying in buddy groups, so you should look at 2 person tents.

Sleep System
Next in the big 3 is your sleep system. The more comfortable you can make yourself when you are sleeping in the backcountry, the more likely you are going to want to return. Some will say the sleep system is made of two primary parts: a sleeping pad and a sleeping bag (or quilt), but I typically add in two more categories: a pillow and your sleep wear.
As I have mentioned many times on this site, having comfort on the trail is very important to me. Though I have found scouts don’t need as high of a quality of a system to be comfortable, but you do need to make sure they have a properly rates system for the weather.
My Recommendations
Sleeping pad: For scouts you can start with something as simple as a foam role. This worked for me as a scout and I find it interesting at how many scouts still use them today. They are very inexpensive and can be found at most Walmart’s. You can also find plenty of air pads for quality prices on Amazon, such as this one. If you do get these for your scout, make sure they know how to patch them on the trail, as there is nothing that sucks more than waking up in the middle of the night realizing your air pad has a hole in it and you are laying on the ground.
I have the NEMO Tensor Ultralight Insulated Sleeping Pad, another one of my big purchases. It weighs in at just over a pound and has an insulation R-value of 4.2, which makes it really good for the winter camping that I do as well. I also have the NEMO Switchback Foam Sleeping Pad, which I use to give an added insulation value when I’m winter camping by placing the pad under my air pad.
Sleeping Bag / Quilt System: Sleeping bags are an important part of your sleep system, because nothing will ruin your camping experience more than not being able to sleep because you are cold. This is something that we are always looking out for with our new scouts, because in many situations parents don’t know exactly what they should buy yet, or the scout is still using something they’ve used in the past at sleepovers. Depending on what part of the country you live in and what environments you plan to camp in, these are the biggest things that will determine what temperature rating you want your bag at.
One thing I have learned about sleeping bags is to always go lower than what you believe you will need. Most (but not all) sleeping bags will say, for example, they are rated for 20 degrees, which will be true, but this is the “you can survive at this temperature” rating, not the I’m warm and comfortable rating. So if you plan to camp in temperatures of 30+ degrees, then get a 20 degree bag. Just remember, you can always unzip the bag to cool off at night. I typically tell scouting parents to start out with a 20 degree mummy bag, these can be found at reasonable prices at places like Dick’s, Big 5 or even Play It Again Sports. Here is a good starter bag even on Amazon.
Now if your scout starts to get into winter camping, like our troop does pretty often in Colorado, then you start looking at some 0 degree bags or even a sleeping bag liner. The nice thing about the liners is that you can take it when needed and leave it at home on those trips where it’s not. You can find liners as simple as this one, or you can go all out and get the Sea to Summit Reactor Insulated Sleeping Bag Liner which can add up to 25 degrees to your current bag.
In backpacking, one of the places I’m always trying to shed weight is in my Big 3, which as we discussed here includes your sleep system. Quilts are another product that’s really worth looking into if you find yourself loving backpacking the way I do. If you have never used a top quilt then it is basically a sleeping bag without the bottom. The theory goes, when laying in your sleeping bag you are smashing the down or synthetic stuffing material, which is really causing it to do very little in keeping you warm, and if you are carrying a decent sleeping pad that is helping insulate you from the ground, then do you really need that excess material. Most say you don’t. I recently purchased the REI Magma Trail 30 degree quilt when it was on sale last year and used it a few times last summer. I have enjoyed it so far and this crazy thing is only just over a pound.
I also have an older version of the Marmot Never Summer 0 degree Mummy Bag which weighs just over 4 lbs. but this thing has never failed at keeping me warm. Here is a link to the newer version of the model that I have. This is a great example of when you buy quality gear it can last you a lifetime, as I have had this bag for well over a decade. Yes there are tons of other sleeping bags out there that are less weight or maybe even better quality, but I haven’t convinced myself it was worth the purchase yet, when I have something that already works. I also have 4 or 5 other summer weather sleeping bags from over the years that I either let friends borrow or will take as an extra bag in the event a scout gets cold on a trip.
Pillow: You will never find me camping without a pillow!! It is one of the few items that I refuse to cut weight on. I made the mistake one time to try a blow up ultralight backpacking pillow, and I immediately came home and gave the pillow away to a friend. I have also tried not taking a pillow and just stuffing clothes in a stuff sack to use as a pillow. Many of these techniques work for many people, but they do not for me. The best pillow I’ve ever found is this Memory Foam Camping Pillow I found on Amazon. It weighs in at just over a pound, but it is the most comfortable thing I have ever found. I did recently find a Therm-a-Rest Compressible Pillow that looks like it would be really comfortable, but I could not justify the cost when it would only save me an ounce or two from what I already had, as I would have wanted their larger pillow. Ultimately, pick what works for you, but remember comfort does matter when on the trail.
Sleeping Clothes: Sleeping clothes is one of the items that so many people forget or decide to leave out when backpacking. Some will even tell you that you are not supposed to wear clothes in your sleeping bag, but this is another one of those “to each, their own” situations. I personally like wearing at least some clothes to bed, especially as I’m getting older, because it makes it a whole lot easier when you need to make one of those nightly bathroom trips. During the summer months I may only wear a pair of shorts and a t-shirt, but during the shoulder seasons and winter I like to wear some wool socks and a thermal layer. The #1 rule I tell all our scouts, is to not get into your sleeping bag with wet clothes. Even a pair of good quality socks you’ve been hiking in for the day will most likely have some level of sweat in them, so it is always good to put on a fresh pair of sock before climbing in for the night. It also keeps you from having to put on a new cold pair in the morning.
Lastly, when you are camping or backpacking in bear country you don’t want to sleep in any clothes that you have cooked or ate in, as you would be taking smellables into your tent with you. Just another good reason why you should have a separate set of clothes to sleep in.
Car Camping Extras: If I’m car camping with my family or with the troop, then I add a couple extra items to my sleep system that I normally would not take backpacking. The first is a cot. I found one by Redcamp on Amazon that I really like. There are lighter and smaller options at REI, such as the Helinox Lit Cot, which weighs just under 3 lbs., but it is really expensive and I really don’t have to care about the weight when I’m car camping. I’ve also never really thought a cot could replace the comfort I get from my sleeping pad.
Speaking of sleeping pads, when I’m car camping I do step up from just a standard air pad like I mentioned above and I use a larger air and memory foam pad. I found this one, made by Wellax on Amazon. This thing has 2 inches of memory foam with an added 1 inch air chamber in the middle, which when inflated it becomes the most comfortable 3 inch sleeping pad I’ve ever owned. Put this thing on top of my cot and I sleep like a king!
Backpack
The last part of the Big 3 is your backpacking system. For many years I refused to spend the money on a good backpack. Each year, I was always trying to decide what 1 or 2 high quality items am I going to spend my money on and I would always talk myself out of getting a new backpack.
For many years I was still using the same external frame backpack I had in college. Eventually I did buy myself a nice weekend backpack, but I never really had anything good to get more than 3 or 4 days on the trail. So a few year ago, when my son and I decided to sign up for Philmont, I decided it was finally time to take the leap. I went to REI and let them figure out all my measurements and then walk me through all the options of their top 3 recommendations. I walked out of there that day with a new backpack and boy did it change my life on the trail. I could not believe how great it felt to have a backpack with quality support. As a scouter, you will find that you end up carrying more weight than you might when you are out on your own, either because you want to make sure you have extra first-aid supplies, food or even gear for those worst case scenarios where the scouts didn’t plan or pack properly.
My Recommendations
For a new scout I always tell parents, don’t buy new, unless you just want to, because you never know if your scout it going to actually like backpacking. But what I do tell parents, is to take your scout to a place like REI and find out what their measurements are and what size they would recommend. You can easily google this information, but I just find it better to go to the pros. Then once you know your size, then you can check out the second hand stores, Craigslist or Facebook Marketplace. Kids are always out growing things like backpacks and you’ll be surprised at how many quality used products you can find getting sold for really great prices.
If you are having a hard time finding the right size and end up having to purchase something new, there are plenty of decent entry/mid level options out there. Both of my boys have had multiple different used backpacks, but I did end up purchasing one recently for my oldest. I found the LooWoko 50L Pack that has worked really well for my oldest son in his last couple years in scouting. He even has a tendency to take extra gear from other scouts and has never complained about how this pack wore. Though, this summer he and I will be doing the Colorado Trail, so I will probably help him upgrade to something a little nicer.
As to my packs, I had my older Kelty external frame pack, which of course they don’t make any more. Then I had an Osprey Stratos 36L Pack, which I did really like and worked really well for short weekend trips. But recently I made the move to the Gregory Baltoro 65L, which has been amazing! There were a few main reasons I ended up choosing this over some of the others. I loved how the back zipped open like a suitcase (no more pulling everything out just to get to that 1 item at the bottom), the water bottle holder can actually be reached while wearing, and it came with a day pack and pack cover as a part of the pack.
There are many other great backpacks and companies out there, so go with what works for you. Now there are also a lot of great companies making frameless backpacks, which is the craze of the ultralight world. I myself, as mentioned before, end up caring more comfort or safety items and prefer a good framed backpack. For Philmont I had at least 50 lbs. in this pack for the majority of the trip and I hardly noticed it at all.

Cooking
Now let’s go to one of my favorite topics on the trail….FOOD. Here we are really only going to cover my backpacking recommendations for cooking on the trail, because when car camping you can pretty much carry whatever you want. I have been known for throwing my smoker or griddle in the back of the truck and cooking up a good steak or some fried rice on a family camping trip.
When backpacking we have to think more about weight and room in the backpack, which leads us to thoughts like how do we get the most calories in the smallest package. Or do I really need that full-size skillet if it’s just me. If you are camping with a group such as a troop then you will need more than if you are just jumping out on the trail by yourself for a weekend.
My Recommendations
For individual trips - I have the Pocket Rocket and a small Titanium Cup. It’s the perfect minimal cooking set. The cup came with a bag, which I was able to use to carry the whole system. First, I put the lid in the bottom of the bag, then I put the cup, the Pocket Rocket case (there should be room in the case for a mini bic lighter), and lastly a fuel canister. There should then be just enough room to close up the bag over it all. I have also used a Jetboil as well on some past trips. Add in a Titanium Spoon and some hot sauce and the set is all complete.
For a group trip - I have a MSR White Gas Stove as it has a more stable base and can hold a bigger pot. It is also really good for higher altitude or cold weather. You are going to want a bigger pot (6-8 qt), a large cooking spoon and spatula for when you are with a larger group like a troop.
Water Filtration
In this section I will also add in water filtration. You want to make sure you have a reliable system for filtering your water, because things like Giardia is no joke when out on the trail. There are tons of water filtration systems out there, from something as simple as the Sawyer Squeeze that can be screwed on the top of a water bottle, an actual water pump or my favorite, a gravity filter. When you are going out with larger groups it saves a lot more time to have a system that can filter a larger amount of water in a shorter amount of time. I personally started using the Platypus GravityWorks 4 liter gravity filter when going with our scout troop and I love it! This thing only weighs around 11 ounces and can filter 1.75 liters per minute. I’ve gotten to where I even carry this with me when I go by myself, just because I like how fast it is, and in those situations where water is not at camp I can fill up the dirty bag and carry it to camp to filter later. I typically also carry a small bottle of Potable Aqua Iodine Tablets just for emergencies.
Clothing
Clothing is one of those things that you probably already have plenty of, but I’ll give you a few recommendations on what is the right type of clothing to have. When it comes to clothing and camping/backpacking, it is all about the layers. The clothing you wear can also make a big difference in your comfort level while on the trail.
My Recommendations
Base Layer
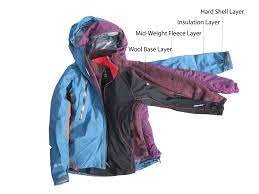
Your layers are going to differ a bit depending on the weather you are going out in. Your basic layering system is to have a base layer, a mid/warm layer and then an outer layer. Let’s start with the base layer. In the summer you are not going to want thermals, like you would in the winter, but you may still want a longer layer to help protect you from the sun. When backpacking you could end up with many hours of your day being exposed to the sunlight, and the last thing you want when on a multi day trip is to get a nasty sun burn. For base layers I always recommend moisture wicking materials, such as polyester, polypropylene, nylon, or merino wool. Cotton should not be a base layer. Teach your scouts, “Cotton is Rotten” as a great way to remember this. During the summer I prefer a light weight long sleeve, something like this, as they as still cool and keep you protected from the sun. Sometimes I will wear poly short sleeves, but then I make sure to have sunscreen with me as well. During the winter seasons my base layer is normally an Under Armour shirt and pants set like this.
I also consider underwear and socks to be part of the base layer. I have found that poly boxer briefs are my favor choice on the trail. I’ve always regretted the times I accidentally packed any of my cotton briefs, as they always end up causing chaffing. A good pair of poly blend briefs can work wonders, you can even get away with wearing them for a couple day before you need to wash them in a stream. Socks is one of the things that I never go cheap on, because as you have heard me say before, taking care of your feet on the trail is one of the most important things you will do. No matter the different types or brands of sock I’ve tried over the years, I have still never found anything I like better than Darn Tough merino wool socks. I always go check out REI’s garage sale area and normally find them at half off, but on rare occasions I will buy them new. Though these socks are definitely expensive, they do come with a lifetime warranty, which means if you ever get a hole in one you can take it back and they’ll give you a new pair. To this day I have only had one pair ever get a hole in them. This is also one of those parts of my gear that I will not wear any other time but when I’m hiking, as I want them to last.
Mid/Warm Layer
Now to the mid/warm layer. Whether you are adding a layer on a cool afternoon/night during the summer, or you are moving to the next layer of your winter wear. I typically will have 1-2 layers in this category. The first layer is a fleece pullover, these generally can be pretty light weight, and on most summer nights will be the only layer I carry for the mid-layer. Here is my favorite fleece mid-layer I have. Next I will add a light weight down puffy jacket. Mine is a basic REI down jacket that I found many years ago on one of the REI sales. It’s black and has lot of tenacious tape on it, but it has served me well for many years. A similar jacket would be this one. Synthetic companies are getting closer and closer to replicating what down can do and they are typically a bit cheaper, but I would definitely try the jacket out around the neighborhood before I committed to using the gear on the trail. Synthetic is a lot better in wet conditions, as down can loose its ability to keep you warm once wet, I just typically carry any outer layer that helps me keep my down protected in those conditions.
Outer Layer
Our last layer is the outer layer. No matter the season, I always have an outer layer. During the summer I use my rain suit as an added layer if for some reason my fleece doesn’t seem to be enough, or if it’s raining and chilly. There are a lot of different options out there for rain suits, such as Fogg Toggs, which my boys love, and they are at a price that I don’t mind if the boys get stupid in them and tear them. And then there are the light weight ones I found made by Swisswell. If it is during the middle of the summer then I may only carry the top part of these, but 75% of the year I will carry top and bottom, because the quickest way to get cold is to get wet, and with the set only weighing half a pound it doesn’t bother me to carry it. During the winter months, I will most likely carry some snow pants and a higher quality shell similar to this.
Shoes/Boots
The last portion of clothing is shoes. This is one of the most controversial topics in backpacking! Are you Team Trail Running Shoes or Team Hiking Boots??? I will start off by saying, to each their own, but then I will also add in if you are working with scouts, there are tons of scout summer camps who have proven that they get less foot related injuries when they require scouts to wear ankle high boots, especially any camps in the mountain areas. I personally have been known to have challenges with my ankles and therefore I choose to wear hiking boots when on the trail. A few years ago I found the most amazing pair of boots I have ever owned, Oboz. I didn’t even feel like I had to break these in as much as I have past boots. But ultimately what I recommend, is for you to go down to REI or any good sporting store and let them fit you for some boots. This will probably take you a couple hours at least, because they will have you try on a few different brands and then you walk around testing them out on mountain like rocks to see how they feel. Even if they are awesome like my boot, please make sure to spend some time testing them and breaking them in before you use them on a longer trip!
I hope these recommendations have been helpful to you and hope that you have some amazing times and memories made out on the trail! Here is a summary of all the recommendations I made above. If you are looking for food recommendations, then here is a list of items I have purchased for larger group backpacking trips.